You probably already how to play an E major chord in the basic open position. Why learn more ways to play E major on baritone ukulele?
As beginners, we think of chords individually—how to play a C major, how to play an E minor, and so on. But over time, we learn to think of chords in groups that fit together in patterns that appear again and again in songs. Different ways of playing the same chord allow us to play these common patterns, called chord progressions, more easily.
More ways of playing a particular chord also help you to:
- make faster chord changes (see all my tricks for faster chord changes in this article).
- control the high note to form a melody, called chord melody or chord soloing.
- control the low note (the bass note), which gives the chord a slightlly different flavor and lets you make interesting bass lines with the low notes.
In this article we cover five different ways to play an E major chord. At the end, I’ve included an Appendix for Theory Nerds, to show where an E major chord appears in the keys that you’ll typically be using on baritone uke.
If you need to review the five basic major chord shapes in their open and moveable shapes, check out this article with lots of full-color diagrams.
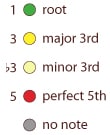
Color key:
E Major – Option 1
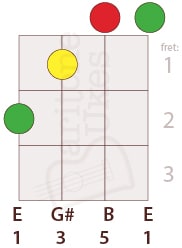
Option 1 is the basic open position for E major on baritone ukulele.
Use this shape to get the note E on the bottom of an E major chord. It is also the position for playing a root position E major chord, i.e. 1-3-5-8.
Here is the moveable E major shape. Use it on the 12th fret to play an E major chord:
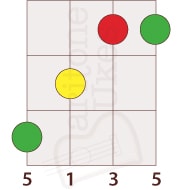
Note that the moveable E shape is the same as the F shape.
It’s helpful to realize that the moveable version of a chord shape is the same as its open position counterpart. In the open position, one or more strings is played open. To move the chord across the neck, the open strings must be fretted, and the rest of shape stays the same as you move to a higher fret.
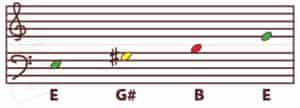
Here is the music notation for the open position E major chord shape:
E Major – Option 2
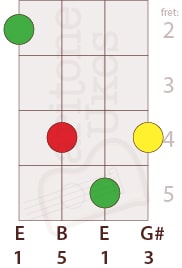
Option 2: On the 2nd fret, use the moveable D shape to make an E major chord.
Many players find this shape to be rather difficult. But even if you skip this position (you can choose option 1 or option 3 instead) it’s still helpful to understand this shape and how it fits into the sequence with the other shapes.
The sequence of the shapes is explained in more detail below. Meanwhile, notice how each shape begins where the previous shape ended.
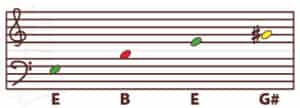
Here’s the music notation for option 2:
E Major – Option 3
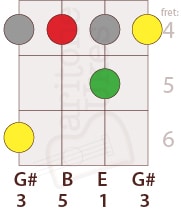
Option 3: On the 4th fret, use the moveable C shape for another way to play an E major chord.
Use this shape to switch easily between E major and C# minor, a move that happens often with songs in the key of E (from the I chord to the vi chord).
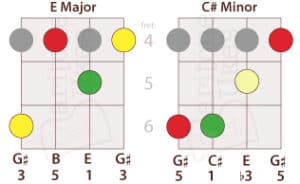
Here’s what option 3 looks like in music notation:
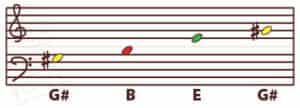
E Major – Option 4
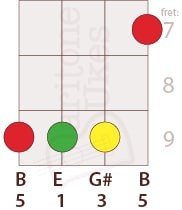
Option 4: On the 7th fret, use the moveable A shape to play an E major chord.
To quickly move between E major and D major, slide this shape two frets back toward the nut. This move happens often when your song is in the key of A (because D major and E major are the IV and V chords in the key of A).
Here is option 4 in notation:
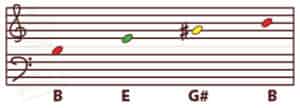
E Major – Option 5
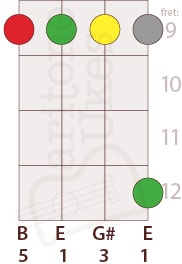
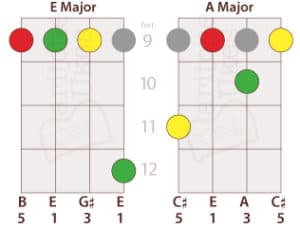
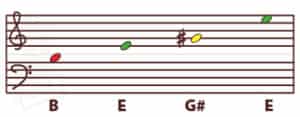
Option 5: On the 9th fret, use the moveable G shape to play an E major chord.
Learning these shapes higher up on the neck is really helpful for chord soloing and learning to play riffs and runs.
On the 9th fret, you can easily switch between E major and A major (the I and IV chord in the key of E) like this:
Here is what option 5 looks like in music notation:
How to remember the order of the chord shapes as you move across the neck
Let’s review the options above. To play an E major chord, use these shapes:
- open E shape – open position
- moveable D shape – 2nd fret
- moveable C shape – 4th fret
- moveable A shape – 7th fret
- moveable G shape – 9th fret
You can easily remember the order in which to use these shapes with the word CAGED. To play E major chords across the neck, start with the E shape at the “zero” fret. Then proceed up the neck with the other shapes in the order of the word CAGED. So you would get E-D-C-A-G. The sequence repeats starting on the 12th fret.
This order works for every major chord. For example, to play C major chords across the neck, start with the C shape on the “zero” fret, then continue the sequence of shapes in the order of the word CAGED, so you would get C-A-G-E-D.
This is called the CAGED method.
For more options for playing chords across the neck, check out my article about the CAGED method for baritone ukulele. I spent weeks on those illustrations. Hope you find them helpful!
Appendix for Theory Nerds
This chart shows you where an E major triad occurs, in terms of scale degree, in the six easiest keys for baritone ukulele.
I recommend focusing on the easiest keys for baritone uke, and using a capo if you absolutely must play in other keys.
Some ukulele and guitar teachers recommend focusing on just two keys, C major and G major. I think that’s a great idea, for starters. But for baritone ukulele, I also recommend working with the key of D, because D is the lowest note on your bari uke.
Learning those three keys, and how to use a capo, will allow you play almost popular any song. But, at the most, I would stick to the six easiest keys for baritone ukulele.
Getting back to our E major chord and the 5 options shown above, any particular major chord functions as a different scale degree in different keys. Like this:
E
E
E
E
E
E
Factoid: E major is the IV chord in the key of B major, the key of five sharps—a key we don’t often use with baritone ukulele. Why? Because the chord shapes needed to play the most common chords in the key of B major aren’t the friendliest shapes. It is far more practical to play the song in the key of A and use a capo on the second fret to achieve B major. Or, play the song in G major and use the capo on the 4th fret to achieve B major.


0 Comments