
Like all string players, I’ve searched for every trick in the book to improve my chord changes. Here’s what I’ve learned. Most of the beginner techniques to speed up chord changes on baritone ukulele are the same as you would use for guitar and traditional ukulele. The intermediate techniques such as chord options are specific to baritone ukulele.
Practice the Chord Change Separately from the Song
If you’re researching tips for increasing the speed of your chord changes on baritone ukulele, you’ve quite likely already tried practicing the chord change separately from the song. If not, this is step one.
Don’t just plow through the song making the same mistakes on each pass. It is said that repeating the same actions over and over while expecting different results is the definition of insanity. Maybe. It’s definitely the definition of a waste of time.
Release the Previous Chord Earlier
As a new player, half the problem with chord changes isn’t your fretting hand. It’s your brain. Your brain needs to think about what to do next, before it can tell the hand what to do.
So try this: Lift your fretting hand early, letting the last strum of the previous measure be all open strings. The sound of open strings between chords is a very common sound in popular music. You’ll recognize it. The open-string strum is a distinctive part of the acoustic guitar sound.
This technique gives your brain an extra moment to think about what’s coming next so you can be ready for the next chord, right on the down beat. Practice a four-count where the first three counts are a chord and the fourth count is all open.
Relax Your Hand and Fingers
As beginners, we tend to clutch on to that neck for dear life, as if our fingers are holding on to the edge of cliff. This is natural because our muscles over-react to movements that are unfamiliar. Think about how a young child plays the piano with their whole arm, when all that it is needed is small finger movements.
Over time, your fretting hand will naturally become more relaxed as you build up muscle memory and your brain-body connection becomes faster and more confident. Meanwhile, try to lighten up that grip and relax.
Practice Each Chord By Itself
If you’ve isolated one chord change to work on, and you’re using the methods described here, but it still isn’t going well, then you need to put the chord change aside for a moment and just work on one chord by itself. Try this: strum all the open strings, then strum the chord, then strum all the open strings again, then the chord again, using a slow steady tempo.
Or slow it down even further with two strums of the chord, and two strums all open, back and forth. Then go back to one strum of each.
Repeat this process for the second chord of the chord change. Then put them back together and practice changing between them with an all-open strum in between.
This approach will be even more effective if you use a metronome or drum track.
Use Slo-Mo to Find the “Tempo of Possibility”
Slow motion is the secret sauce for training accuracy into the muscle memory. Don’t train your muscles to make the same mistake over and over. Slow it down, way down, until you discover the speed at which you can make the change correctly several times in a row without pausing or stumbling.
If there’s a magic bullet that will allow you hit your target goals as player, slo-mo is it. When beginning musicians hit a rough patch, the instinct is to speed up. Pros slow down to work through a difficult passage.
Have you ever seen dancers rehearse? They don’t start dancing faster and faster to get through the hard part. They slow down to work on each movement individually.
When you’re practicing, don’t play through mistakes. You’ll just train yourself to repeat those mistakes. Stop, and work on the problem. But when you’re jamming with friends and/or singing along, keep the beat, no matter what. People will happily overlook mistakes. But stopping and starting ruins the song experience.
You can use a metronome app for this technique, and don’t worry about how slow you’re going. You can also use a canned drum track with an app like GarageBand, as long as you can freely adjust the tempo. Some people find it easier to play along with drums than just a metronome click.
You want to avoid the situation where you slow down and pause and hesitate each time you make the chord change. If you do that, you’re training your brain and your muscle memory to lose the tempo. Boo! Don’t do that!
Just keep slowing it down until you find that “tempo of possibility” where you can actually play the chord change accurately and smoothly with the beat. In this way, you train your brain and your muscles to make a smooth chord change in tempo. Then you can gradually increase the speed until you reach the tempo you want.
Remember: accuracy first; speed later.
It may take several practice sessions or more to reach the performance tempo. That’s fine. There are some songs that I don’t play as fast as the pros, because I can’t. But I can play the song pretty well at a slightly slower tempo, and that’s fine. Just don’t perform it at heroin tempo like Jerry Garcia. Zzzzzz.
Look for a Pivot Point or Anchor Point
Analyze the two chords you’re trying to change between. Is there one finger that can stay on the same string? Maybe it can stay on the same fret too, or just slide one fret. Or perhaps your thumb doesn’t need to move.
Look for the muscles in your hand, fingers, and thumb that don’t need to move, and use that as your pivot point or anchor point.
Here’s a basic example for baritone uke (the same as the four higher-pitch strings of the guitar). When switching between C and G, use your pinky to fret the G chord, like this:
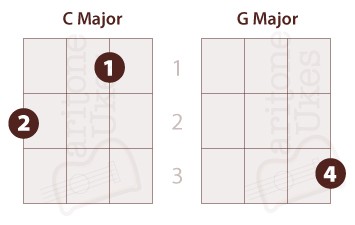
Example: The anchor point here is your thumb (on the side of the neck). Your fingers are moving up and down, but the thumb (and the rest of the hand) is stationary.
1 = index finger
2 = middle
3 = ring
4 = pinky

Example: The pivot point is your pinky finger on the third fret. It stays stationary, as does the the rest of the hand. Only fingers one and two (index and middle) are moving.
Notice that the C major chord can be played with or without the pinky on the third fret. Both are correct.
Analyze the chords in your troublesome chord change. Look for the muscles that don’t need to move and keep them steady.
Chart the Rhythm Accurately
You might be surprised at this tip. Sometimes the problem isn’t actually the chord change itself. You won’t be able to nail your chord changes in tempo if you’ve got the rhythm wrong. This problem occurs frequently when you’re learning a new song. If you keep practicing the chord change, and yet you still mess up at the same place all the time, you need to check your count.
Are you using a song sheet that just has the lyrics with chord letters written above words? Don’t do that. You need to make a simple song sheet that shows the COUNT.
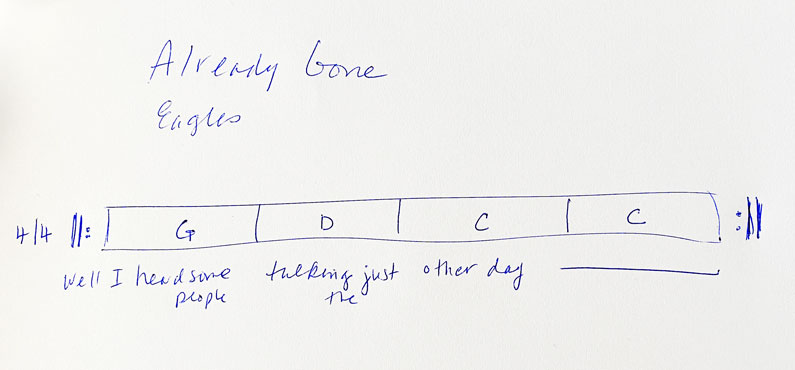
Example: A simple song chart showing the count. 4/4 means four beats per bar (measure). The symbols on the left and right are repeat symbols.
To make a simple chart that shows each beat of the song, use a format like this:
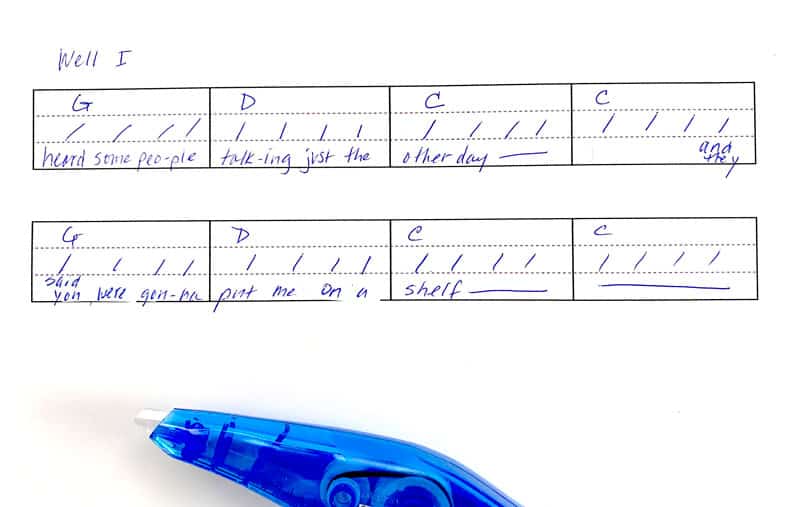
Example: A simple song chart showing each beat with a slash. Corrector tape is your friend!
You can use an app to make boxes on a page. I usually use the tables in Word. You could also use a spreadsheet. Each slash means one beat. To add the chord shapes, you can use a mini chord stamper tool like this:
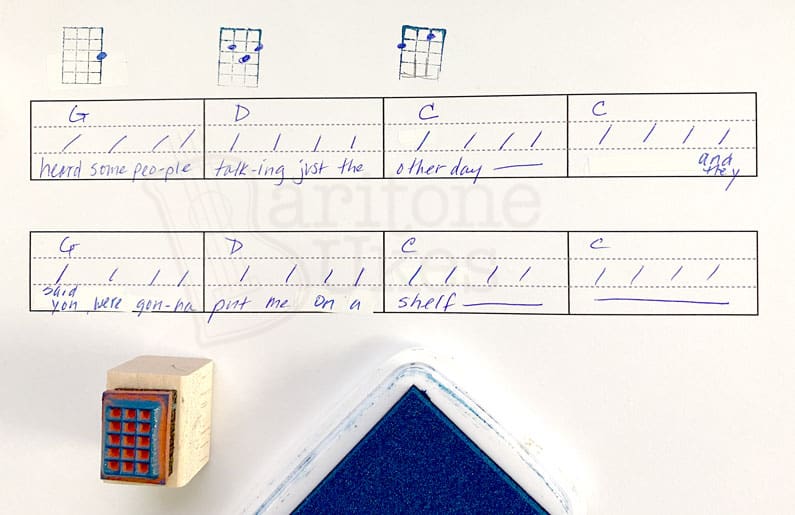
Example: Using a mini chord stamper tool to add the chord shapes.
Your chord changes will get a lot faster when you’re confident that you really understand the song. A simple but rhythmically correct song chart will allow you to figure out many songs that have eluded you so far.
Isolate the Problem and Diagnose the Cause
Sometimes we need to look at a chord change problem from a different angle to figure out what’s wrong. When you slow things down to very slow, you have time to analyze all the movements of your body to see where you have extra motions that aren’t necessary. Check your wrist, your palm, your elbow. Are you making unneeded motions?
I’ve caught myself doing all kinds of exaggerated hand and arm movements that are pretty goofy when you think about it. I don’t need to swing my elbow out or cock my wrist in order to move one finger. Don’t do that!
Are you tapping your feet? Rocking your shoulders? Bobbing your head? None of that is needed for a chord change.
Relax your body and eliminate all unnecessary motion. Sure, when you’re performing, you may rock out a bit. But when you’re practicing, be intentional about every move you make.
Choose the Right Strap
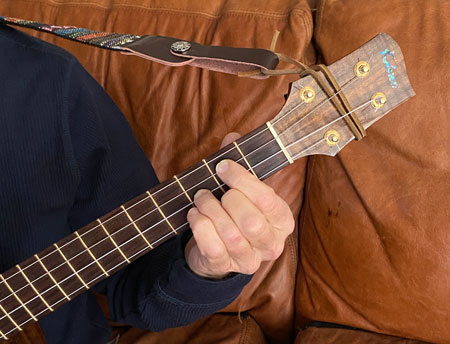
Baritone uke is larger and heavier than traditional ukes. Playing without a strap doesn’t work out too well, particularly while standing up, but even while sitting down.
As a beginning player, I struggled with this problem a lot. I was supporting the weight of the neck with my fretting hand. I could see that I was holding the neck with my hand, and changing how I was holding the neck, every time I changed the chord position. This issue was holding me back from faster more accurate chord changes.
I got a strap, and it helped somewhat. But the problem persisted to a degree. Finally I sought the advice of a pro guitarist friend, who suggested strapping to the headstock in the style of a folk guitarist. Voilà. Night and day. I still have to remind myself to let the strap take the weight off the fretting hand, but the improvement was dramatic.
Here’s what it looks like:
Tip: Avoid holding up the weight of the neck with your fretting hand. Let the strap take the weight.
A strip of rawhide does the trick, without installing a strap button.
Hold the Instrument Securely
Is your instrument bouncing around while you’re trying the fret the chords? This problem happens more while standing than sitting, and perhaps occurs more often for curvy people. Watch yourself in the mirror and pay particular attention to the body of your instrument. Is it tilting up and down or bouncing at all?
I have to admit to not having a flat belly. And I like to play standing up sometimes. So I analyzed myself in the mirror, and I watched videos of other musicians. It may be hard to find baritone ukulele performance videos to watch. I recommend studying acoustic guitarists rather than traditional uke players, because the bari uke is more similar to guitar when it comes to support.
So watch acoustic guitar players in performance videos and study how they hold their instrument throughout a song and throughout a set. Look for players who have a similar body type to yours and see how they do it.
For me, as a right-hand strummer, I rest the body of the uke solidly against my right hip, and use my right elbow to put mild pressure on the lower bout. My left hand is a little farther forward from my body than the right. This gives me a good angle and solid support to hold the instrument steady so that the neck isn’t bounding out of my hand while I’m trying to change chords.
Use a Capo
A capo can be used to change the key of a song, usually because the singer needs the melody to be higher or lower. But there’s another way to use a capo: to keep the song in the same key while using different, easier chord shapes.
For example, let’s say you’re friends are playing a popular song in the key of A major. You’ve learned the chords to play along, but you just aren’t fast enough at the chord changes to play along at tempo.
It turns out that baritone uke chord shapes are much easier in the key of G major. Wouldn’t it be great if you could use the easier chord shapes of G major and still play the song in A major along with your friends?
You can, by simply putting a capo on the second fret, because G + two frets = A.
If you want to compare the difficulty of chord shapes in different keys, check out the free printable chord charts on this page, where I’ve posted the absolute beginner chord chart and the beginner level 2 chord chart for baritone uke.
Choose an Easier Key
Simple songs are easy to transpose. Many songs only have three or four chords, so they don’t take long to transpose yourself. Or you can google “transpose song online” to find websites that will automatically change the chords for you. Here’s a site you can try.
Which key should you transpose to? G major is the easiest key for baritone uke, and it’s often a friendly key for male voices and lower female voices. Or try the Key of C for females and higher voices.
If the song is in a minor key, try Em (the related minor key to G major) or AM (the related minor key to C major).
To learn more about which keys are the easiest keys for baritone ukulele, check out this post.
Choose an Easier Song
If you find you’re not successful with any of these strategies, it means that the song is too difficult for you right now. Choose an easier song for now, and come back to the harder one in a few months.
We all have songs we’d LOVE to play, those back-burner songs we return to again and again. I’ve been working on Blame It on My Youth for, um, longer than I care to say. It has jazz chords that change every two beats. I just can’t do it yet. Meanwhile I’m working on a jazz tune that’s a little easier, The Nearness of You.
Know Your Chord Options for Baritone Ukulele
There’s nothing more satisfying for a beginner or intermediate uke player than finding a fast solution to a chord change problem that you’ve been stumbling and bumbling over.
The secret to being able to figure out the fastest option for any given song or chord change is knowing the basic chord shapes and how to move them up and down the fretboard.
The other day I was playing some traditional Celtic folk music with my pro friends and I was pretty tickled to be able to figure out a quick chord change on the fly based on what I’ve been studying. I’ll show you the specific chord change below.
Options for baritone ukulele chord shapes
Did you know that you can use five chord shapes to play major chords all over the neck? You probably already know these five shapes: they are the open shapes that spell out the word CAGED. But if you’d like to review them, check out the illustrations I made for this post.
Similarly, you can use five shapes to play minor chords all over the neck. I’ll have an article about that coming soon.
These ten shapes, five major and five minor, give you tons of options when you learn how to move them to different positions. Then you can pick the fastest option for your situation. Later you can work on the basic shapes for seventh chords, but meanwhile, you can play millions of songs with just the ten basic major and minor shapes.
Intermediate players: Get started learning the notes that chords are made of, paying particular attention to where the root note of the chord occurs in the chord shape. I made some full-color illustrations to help you see the notes at a glance. Knowing where the root is in a chord is a helpful clue when quickly figuring out where to place the shape on the neck for the desired chord. More on this tip later.
Options for baritone ukulele chord positions
Moving chord shapes up and down the neck requires (1) fretting all four strings at once, either with four fingers or by barring with the index finger, and (2) knowing which fret to move to.
I wrote a detailed explanation of major chord positions in this post, with illustrations that show the five movable shapes for major chords and a method for moving them called the CAGED method.
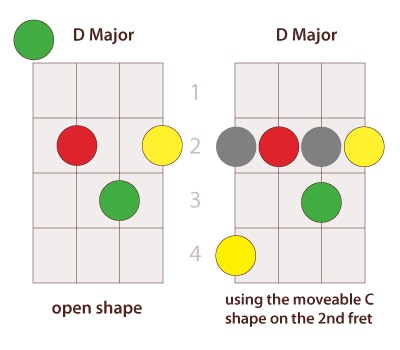
But in short, if you want to use the open C major shape to play a D chord, you need to move the shape up by two frets (because C plus two frets = D), and you need to use your index finger to barre the strings above the C shape, which looks like this:
Figure 1 – Using the Moveable C Shape to Form a D Major:
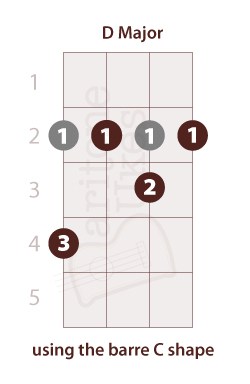
Use the moveable C shape to make a D major on the second fret.
The C shape is one of the easiest moveable shapes. It often comes in handy for playing a D chord on the second fret.
1 = index finger
2 = middle
3 = ring
4 = pinky
Intermediate players: Moving chords across the neck becomes even easier when you learn the notes of the baritone ukulele fretboard. When you’re ready, I have a step-by-step guide with great visuals (lots of original illustrations that took me weeks to create!) to help you understand the fretboard once and for all.
When you combine your knowledge of the fretboard notes with your knowledge of where the root occurs in the chord, it’s an “ah ha!” moment. Time and repetition will help you to map this information in your brain, but once it’s mapped, you’re ability to move around freely on the neck is vastly accelerated.
Putting it all together
When you know these basic ten shapes and how to move them around, you can come up with options on the fly to help you make chord changes faster. Then, practice these changes in slow motion to make them smoother and even quicker.
Getting back to the Celtic song my friends were jamming on the other day: in the past I couldn’t learn songs fast enough to just play along the first time I heard the song 😢. But after learning more options for chord shapes and chord changes, I’m now getting to where I’m figuring out which shapes and positions on the fly so I can play along 😊 without having practiced the song beforehand.
The song was Planxty Davis (a 17th century Scottish Jacobite folk tune) in the key of D major—a very common key for guitars and ukes—and the chord change was D to Bm—a very common chord change in the key of D. Here are the baritone ukulele chords as you would learn them at first on baritone uke:
Figure 2 – The Beginner Shapes for D Major and B Minor
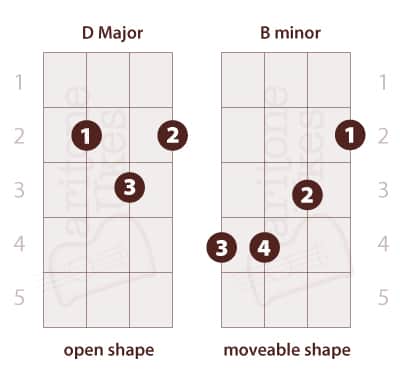
Tip: The Bm shape is actually the Am minor shape, moved up two frets.
Tip: The Bm shape is a moveable shape because all four strings are fretted. Any chord shape that requires fretting of all four strings is a moveable shape.
Tip: As you move the shape, only the letter changes. The chord quality—major, minor, seventh, etc—stays the same.
As you can see above, this chord change can be tricky for beginners and perhaps even impossible to do at tempo. My friends were humming along at a clip of of about 150 bpm and then sped up to about 180. (I used the tap function on my metronome app to find out the tempo so I could practice it later.) I would never have been able to do the above chord change at those speeds.
But happily there’s a quicker way.
Figure 3 – A Faster Option for the D to Bm Chord Change:
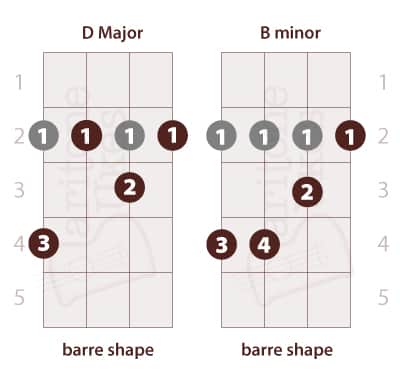
Tip: The only difference between these two shapes is the pinky finger moving on and off the same string on the same fret.
Tip: The D major shape is formed by making the open C shape and moving it up two frets.
Take a closer look at the D chord in Figure 3. It’s actually the same as the open C shape, one of the first chords we learn as beginners, except that the shape is moved up two frets and the index finger adds the barre.
When you add two frets to a C chord, you’ve changed it into a D chord.
Notice that the Bm chord is the same in both diagrams. The only difference is the fingering. When you use the fingering in Figure 2, you can switch from D to Bm and back to D simply by moving your pinky up and down, without moving your hand or your other fingers at all.
So even though my friends were playing fast and the chord change would have been impossible for me last year, nowadays I can do it easily, with my eyes closed (literally!).
Intermediate players: Let’s take another look at the two D major shapes in Figure 2 and Figure 3 above, but this time, I’ll show the root note green:
Figure 4 – Two Options for D Major, Color-Coded
Open D shape: the root note—the D—occurs on the D string (open) and the B string (3rd fret), as shown by the green dots.
The middle note of the chord, the F#, is shown in yellow (the major 3rd), and the top note of the chord, the A, is shown in red (the perfect 5th).
Moveable C shape: use this shape on any fret. The root note of the chord will be on the B string.
When you use this shape on the 2nd fret, it forms a D major with the D on the 3rd fret of the B string.
When you learn (1) the notes of the fretboard, and (2) where the root note is located in the basic chord shapes (the five basic major and minor shapes), you have dozens of options for playing major and minor chords.
Sometimes, you’re just going to be stuck with a difficult change. In that case, you can use the the other techniques to work through the problem.
Now that you’re using options for the chord shapes and chord positions, you’ll be using some of your practice time to tinker around and find the best options for a series of changes that you need to make for a song you want play.
Once you’ve decided how you want to approach all the changes in the song, then it’s time to break it down into individual changes and use slow motion to train the muscle memory into your hands.
In Summary
Music is a lifelong process. Trust the process, and give yourself permission to be a work in progress. Get help from experienced musicians, and find the right instrument for you. Hopefully, it’s a baritone uke!

0 Comments